5 Gorgeous Spring Flowers from Seed: A Complete Guide
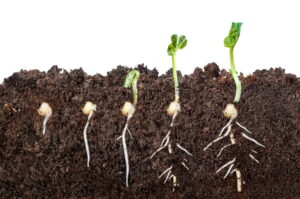
Spring brings renewal to your garden, offering the perfect opportunity to grow stunning flowers from seed. Whether you’re a seasoned gardener or just starting out, growing flowers from seed provides immense satisfaction and significant cost savings compared to purchasing established plants. This comprehensive guide explores five gorgeous spring flowers that thrive when grown from seed in the United States, with detailed instructions to help you achieve a vibrant, colorful garden that will be the envy of your neighborhood.
Understanding the Benefits of Growing Flowers from Seed
Before diving into specific flower varieties, it’s important to understand why growing from seed is advantageous. When you choose to grow flowers from seed, you’re embarking on a rewarding journey that offers numerous benefits beyond mere cost savings.
Growing from seed allows you to select from hundreds of varieties not typically available as transplants at garden centers. This expanded selection means you can create truly unique garden displays with rare or heirloom varieties that showcase your personal style and preferences. According to the USDA’s Agricultural Research Service, preserving plant diversity through growing various seed types is also ecologically beneficial for pollinator health and biodiversity (USDA ARS).
Additionally, plants grown from seed often develop stronger root systems than transplanted counterparts because they grow in their permanent location from the start, never experiencing transplant shock. This translates to hardier, more resilient plants in your garden.
The financial advantages are substantial as well. A single packet of seeds typically costs between $2-$5 and contains dozens or even hundreds of potential plants. Compare this to buying individual transplants, which might cost $3-$7 each, and the savings become immediately apparent. For the price of a few transplants, you can grow an entire garden from seed.
Now, let’s explore five spectacular spring flowers you can easily grow from seed, with detailed information about each variety’s characteristics, growing requirements, and tips for success.
1. Cosmos (Cosmos bipinnatus): Ethereal Elegance in Your Garden
Cosmos embody grace with their delicate, daisy-like blooms perched atop slender stems that dance in the slightest breeze. These stunning flowers bring movement, height, and airy texture to your spring garden, making them perfect companions for more structured plantings.
Origin and Characteristics
Native to Mexico and naturalized throughout much of North America, cosmos have adapted well to various U.S. growing conditions. These annuals typically reach heights of 2-5 feet, depending on the variety, creating a dramatic vertical element in your garden. Their feathery, fern-like foliage provides an attractive backdrop even before the flowers appear.
The blooms themselves range from 2-4 inches across and come in a spectrum of colors including white, pink, magenta, orange, yellow, and chocolate brown. Classic cosmos varieties like ‘Sensation’ offer pink, white, and magenta blooms, while ‘Bright Lights’ delivers vibrant yellows and oranges.
Growing Cosmos from Seed
Cosmos are among the easiest flowers to grow from seed, making them perfect for beginning gardeners. Here’s how to ensure success:
Timing: In most U.S. regions, you can direct sow cosmos seeds after your last spring frost date. According to the National Garden Bureau, cosmos are sensitive to frost, so patience is key. For early blooms, start seeds indoors 4-6 weeks before your last frost date.
Soil Requirements: Cosmos actually perform better in poor to average soil with good drainage. Rich soil tends to produce lush foliage at the expense of flowers. They prefer a neutral pH between 6.0-7.0.
Planting Depth and Spacing: Sow seeds approximately 1/4 inch deep, either in rows or scattered in drifts for a more natural look. Once seedlings reach 4-5 inches tall, thin them to 12-18 inches apart for standard varieties, or 6-12 inches for dwarf types.
Light and Water Needs: Cosmos require full sun (6+ hours daily) to thrive. They’re drought-tolerant once established, making them perfect for gardeners in drier regions. Water seedlings regularly until established, then reduce watering to once weekly unless experiencing extreme drought.
Maintenance and Care
Cosmos require minimal maintenance, which adds to their appeal. Here’s what you need to know:
Fertilization: Minimal to none. Over-fertilizing results in leggy plants with fewer blooms.
Deadheading: Remove spent blooms to encourage continuous flowering throughout the season.
Support: Taller varieties may benefit from staking or growing through support structures in windy locations.
Pests and Diseases: Cosmos are remarkably resistant to most pests and diseases. Occasionally, they may face issues with aphids or powdery mildew in humid conditions.
Companion Planting with Cosmos
The airy nature of cosmos makes them excellent companions for other garden plants. They pair beautifully with:
- Zinnias for complementary color and texture
- Marigolds for pest deterrence
- Sunflowers for dramatic height variations
- Black-eyed Susans for extended seasonal interest
According to research from the USDA’s Natural Resources Conservation Service, cosmos also serve as excellent pollinator plants, attracting a variety of beneficial insects to your garden (NRCS Pollinator Information).
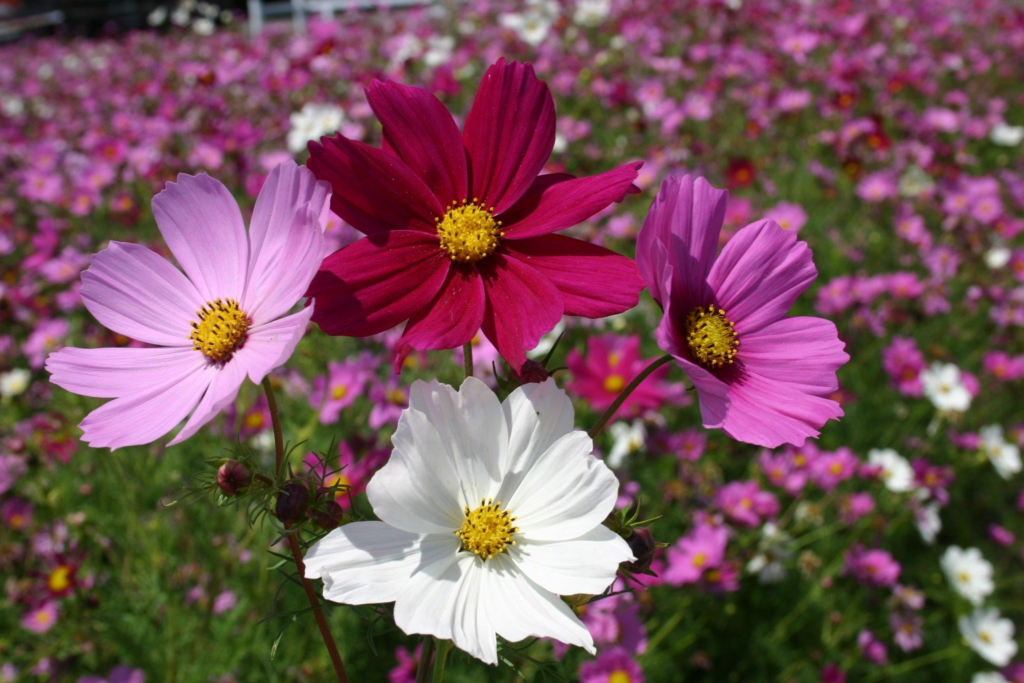
Table 1: Cosmos Varieties for U.S. Climate Zones
| Variety | Height | Bloom Color | Days to Bloom | Best Climate Zones |
|---|---|---|---|---|
| Sensation Mix | 3-4 feet | Pink, white, magenta | 70-85 days | 3-9 |
| Seashells | 2-3 feet | Pink, white, rose | 75-90 days | 3-10 |
| Bright Lights | 3-4 feet | Yellow, orange, red | 65-75 days | 4-10 |
| Rubenza | 2-3 feet | Ruby red | 75-90 days | 3-9 |
| Double Click | 2-3 feet | Double blooms in mixed colors | 75-90 days | 4-10 |
2. Sweet Peas (Lathyrus odoratus): Fragrant Climbing Beauty
Sweet peas are beloved for their intoxicating fragrance and delicate ruffled blooms that bring cottage garden charm to any landscape. These cool-season annual climbers produce an abundance of flowers perfect for cutting, filling your home with their distinctive sweet scent.
Origin and Characteristics
Originally from Sicily, sweet peas have been cultivated and hybridized extensively since the 17th century. Today’s varieties offer improved heat tolerance, making them suitable for most U.S. growing zones when properly timed.
Sweet peas produce tendrils that allow them to climb 6-8 feet on supports. Their flowers come in nearly every color except true yellow and orange, with blooms that may be solid, bicolor, or picotee (edges in contrasting colors). Modern varieties like the ‘Spencer’ types offer larger, wavier petals, while heritage varieties like ‘Cupani’ deliver unparalleled fragrance.
Growing Sweet Peas from Seed
Sweet peas require some specific techniques for best results:
Seed Preparation: To improve germination, nick the hard seed coat with a nail file and soak seeds in warm water for 12-24 hours before planting.
Timing: In USDA zones 8-10, plant sweet pea seeds in late fall or winter for spring blooms. In zones 3-7, sow seeds indoors 4-6 weeks before the last frost, or direct sow as soon as soil can be worked in spring. Sweet peas prefer cool temperatures and will stop flowering once temperatures consistently exceed 70°F.
Soil Requirements: Sweet peas thrive in rich, well-draining soil with a pH of 6.5-7.5. Unlike cosmos, they benefit from compost or well-rotted manure worked into the soil before planting.
Planting Depth and Spacing: Plant seeds 1 inch deep and 3-4 inches apart. If starting in containers, use deep pots (at least 3-4 inches) to accommodate their long root systems.
Light and Water Needs: Sweet peas need full sun in cool climates and partial shade (afternoon protection) in warmer regions. Consistent moisture is essential; never let the soil dry out completely.
Maintenance and Care
Proper maintenance significantly extends the blooming period:
Support Structures: Provide trellises, netting, or other supports at planting time. Sweet peas climb via tendrils and need something to grab.
Fertilization: Feed with a low-nitrogen, high-phosphorus fertilizer when buds first appear to encourage flowering rather than leaf growth.
Pinching: When seedlings reach 4-6 inches tall, pinch out the growing tip to encourage branching and more flowers.
Cutting: The more you cut, the more they bloom. Harvest flowers in the morning when stems are turgid and place immediately in water.
The National Garden Bureau recommends cutting sweet pea flowers daily during peak bloom to prevent seed formation, which signals the plant to stop producing flowers.
Sweet Pea Varieties for Different Purposes
Sweet peas vary in growth habit, fragrance, and suitability for different uses:
Grandiflora Types: These traditional sweet peas offer the strongest fragrance but smaller blooms.
Spencer Types: Modern varieties with larger, wavier blooms, though sometimes with reduced fragrance.
Dwarf or Bush Varieties: Perfect for containers or garden edges, growing just 18-30 inches tall.
The U.S. National Park Service features sweet peas in several historical garden restoration projects, noting their popularity in American gardens since the Colonial era (NPS Plant Conservation).
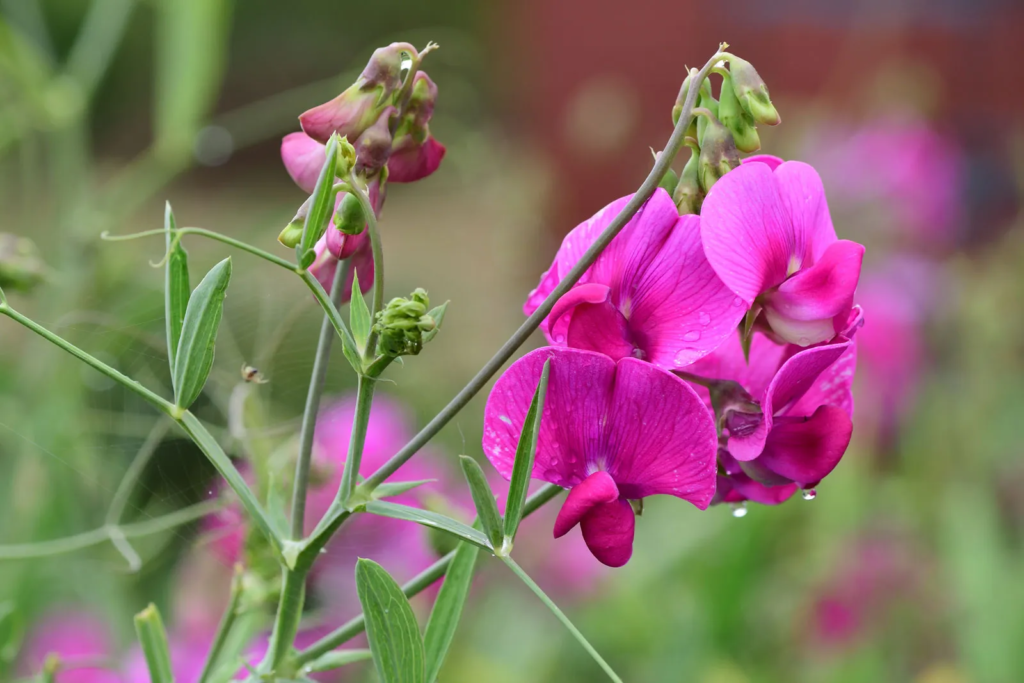
Table 2: Sweet Pea Varieties for Different U.S. Regions
| Variety | Height | Heat Tolerance | Fragrance Level | Best U.S. Regions |
|---|---|---|---|---|
| Royal Mix | 5-6 feet | Moderate | High | Northeast, Pacific Northwest |
| Winter Elegance | 4-5 feet | Good | Medium | South, Southwest |
| Cupani (Heritage) | 5-6 feet | Low | Very High | Northeast, Midwest |
| Mammoth Mix | 6-8 feet | Moderate | Medium | All except extreme South |
| Knee-Hi Mix | 20-30 inches | Good | Medium-High | All regions, container-friendly |
3. California Poppies (Eschscholzia californica): Drought-Tolerant Brilliance
California poppies bring vibrant, silky blooms that open in the sun and close at night. These native wildflowers are perfect for water-wise gardens, creating sweeps of spectacular color with minimal care.
Origin and Characteristics
As their name suggests, California poppies are native to the western United States and Mexico. They’ve adapted to thrive in challenging conditions, including poor soil and drought, making them exceptionally low-maintenance.
These annuals or short-lived perennials (in zones 8-10) typically grow 12-18 inches tall and wide. Their finely divided, blue-green foliage creates an attractive groundcover even when not in bloom. The classic brilliant orange flowers measure 2-3 inches across, though modern breeding has expanded the color palette to include yellow, pink, red, and cream varieties.
Growing California Poppies from Seed
California poppies are among the easiest flowers to grow from seed and often self-sow once established:
Timing: In most regions, direct sow in early spring as soon as soil can be worked. In zones 8-10, fall sowing is preferable for spring blooms. California poppies don’t transplant well, so direct sowing is recommended over starting indoors.
Soil Requirements: These poppies prefer lean, well-draining soil with a pH of 6.0-8.0. They actually bloom better in poor soil, making them perfect for difficult spots in your garden.
Planting Method: Simply scatter seeds on prepared soil and press lightly into the surface—don’t cover, as these seeds need light to germinate. Water gently to avoid displacing seeds.
Germination and Early Care: Seeds typically germinate in 7-15 days with soil temperatures around 55-65°F. Once seedlings reach 2-3 inches, thin to 6-8 inches apart to prevent overcrowding.
Light and Water Needs: California poppies require full sun and very little water once established. They’re perfect for xeriscaping and drought-prone areas.
Maintenance and Care
The minimal maintenance requirements of California poppies make them perfect for busy gardeners:
Watering: Once established, water only during extended dry periods. Overwatering leads to excessive foliage at the expense of flowers.
Fertilization: None required. Fertilizer often reduces flowering.
Deadheading: Optional. Removing spent blooms extends flowering, but allowing some seed pods to mature ensures self-seeding for next season.
End of Season: In zones where they’re perennial, cut back by one-third after the first flush of bloom for a second showing. In colder zones, allow seeds to mature for self-sowing.
The U.S. Forest Service recognizes California poppies as important nectar sources for native pollinators and notes their historical medicinal uses by indigenous peoples (USFS Celebrating Wildflowers).
Creative Uses for California Poppies
Beyond traditional garden beds, consider these applications:
Meadow Gardens: Mix with complementary native grasses for a naturalistic landscape.
Rock Gardens: Their drought tolerance makes them perfect companions for succulents and other rock garden plants.
Erosion Control: Plant on slopes to stabilize soil while adding beauty.
Containers: Dwarf varieties like ‘Pygmy King’ perform well in containers with excellent drainage.
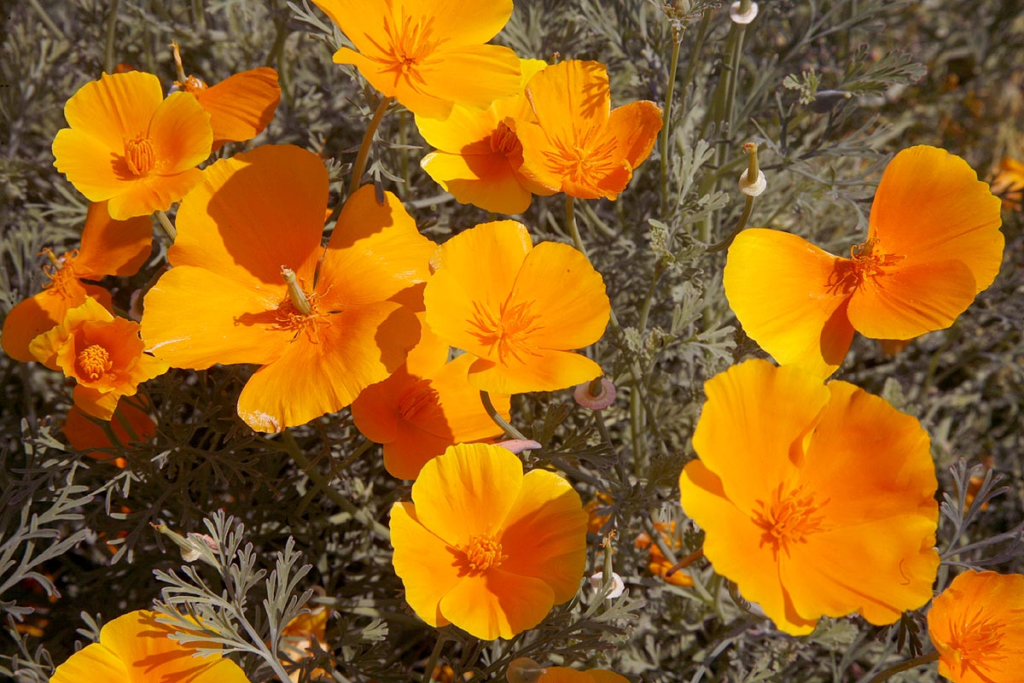
Table 3: California Poppy Varieties Beyond Traditional Orange
| Variety | Color | Height | Special Features | Best Uses |
|---|---|---|---|---|
| Champagne & Roses | Pink, cream, apricot | 10-12 inches | Bicolors available | Border edges, containers |
| Thai Silk Mix | Frilled petals in mixed colors | 8-10 inches | Semi-double blooms | Formal gardens, cutting |
| Red Chief | Deep red | 12-14 inches | Dramatic color impact | Accent planting, wildflower meadows |
| Alba | Pure white | 12-15 inches | Luminous in evening gardens | Moon gardens, contrast plantings |
| Ballerina Mix | Yellow, orange, pink, cream | 10-12 inches | Frilled petal edges | Mixed borders, cottage gardens |
4. Nasturtiums (Tropaeolum majus): Edible Beauty for Your Garden
Nasturtiums offer a triple threat in your garden: attractive rounded leaves, vibrant flowers, and edible parts that add a peppery zing to salads. Their easy-growing nature and pest-repelling properties make them as practical as they are beautiful.
Origin and Characteristics
Native to South America, nasturtiums have been cultivated in North American gardens since the 1600s. These versatile plants come in two main growth habits: bushy types that form mounds 12-18 inches tall, and trailing varieties that can spread 3-6 feet, making them perfect for hanging baskets or as groundcover.
The distinctive circular leaves resemble tiny lily pads, creating an attractive backdrop for the funnel-shaped flowers, which appear in shades of yellow, orange, red, cream, and bicolors. Both flowers and leaves are edible, with a pleasant peppery taste similar to watercress.
Growing Nasturtiums from Seed
Nasturtiums grow readily from their large, easy-to-handle seeds:
Timing: Direct sow after all danger of frost has passed and soil has warmed to at least 55°F. In warmer regions (zones 9-11), fall planting is also possible.
Soil Preparation: Unlike many flowers, nasturtiums perform best in poor to average soil. Rich soil or high nitrogen levels result in lush foliage but fewer flowers.
Planting Method: Soak seeds overnight to speed germination. Plant 1/2 inch deep and 10-12 inches apart for bush types, or 3 feet apart for trailing varieties.
Germination and Early Care: Seeds typically sprout in 7-10 days. Keep soil moderately moist until established.
Light and Water Needs: Nasturtiums prefer full sun but tolerate partial shade, especially in hot climates. They need moderate water—neither soggy nor completely dry soil.
Maintenance and Care
Nasturtiums are remarkably low-maintenance, requiring minimal intervention:
Watering: Once established, water when the top inch of soil is dry. Consistent moisture produces the best flowering, though they’ll tolerate some drought.
Fertilization: Avoid high-nitrogen fertilizers, which promote foliage over flowers. If soil is very poor, a light application of balanced, organic fertilizer at half strength may help.
Pest Control: Nasturtiums actually serve as trap crops for aphids, drawing them away from other plants. They also repel certain cucurbit pests, making them excellent companion plants for squash and cucumbers.
Harvesting for Culinary Use: Pick flowers in the morning when they’re freshest. Younger leaves have the best flavor. Rinse gently before using in salads, as garnishes, or in herb butters.
The National Center for Appropriate Technology’s ATTRA Sustainable Agriculture program recommends nasturtiums as beneficial insectary plants that attract predatory insects while serving as trap crops (ATTRA Sustainable Agriculture).
Culinary and Garden Uses
Nasturtiums offer tremendous versatility beyond ornamental purposes:
Edible Landscaping: Their entirely edible nature makes them perfect for foodscape gardens.
Companion Planting: Plant near cucumbers, squash, melons, and brassicas to deter pests.
Container Gardens: Dwarf varieties excel in pots, while trailing types spill beautifully from hanging baskets.
Culinary Applications: Use flowers to add color and peppery flavor to salads; pickle immature seed pods as a caper substitute; add young leaves to sandwiches or use as garnish.
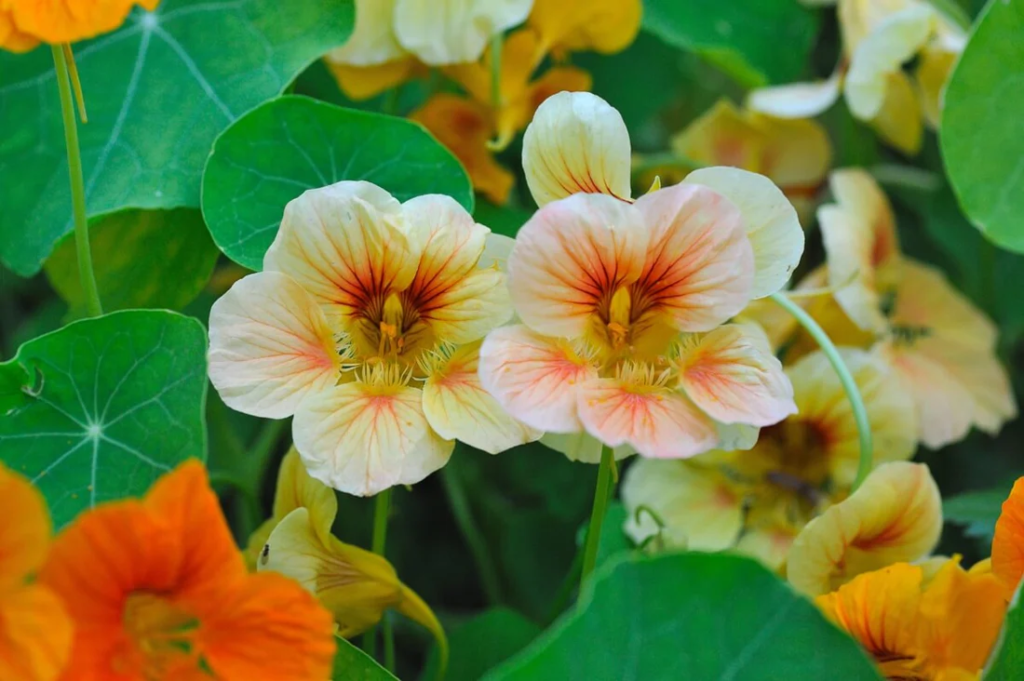
Table 4: Nasturtium Varieties for Different Garden Applications
| Variety | Growth Habit | Flower Color | Best Uses | Special Features |
|---|---|---|---|---|
| Alaska | Compact mound, 12″ | Mixed with variegated foliage | Containers, edging | Cream-splashed leaves |
| Jewel Mix | Bushy, 12-18″ | Yellow, orange, red | Bedding, cutting | Semi-double flowers |
| Gleam Series | Semi-trailing, 2-3′ | Mixed colors | Window boxes, small spaces | Semi-double blooms |
| Whirlybird | Compact, 12″ | Mixed colors with upward-facing blooms | Formal beds, containers | Spurless flowers |
| Crimson Emperor | Climbing, 4-6′ | Deep red | Trellises, fences | Most heat-tolerant variety |
5. Sunflowers (Helianthus annuus): Dramatic Height and Cheerful Blooms
No summer garden feels complete without the cheerful presence of sunflowers. From towering giants to compact dwarfs, sunflowers bring unmatched drama and a quintessentially American character to your garden.
Origin and Characteristics
Native to North America, sunflowers have been cultivated by indigenous peoples for thousands of years. The U.S. National Park Service documents their importance in Native American cultures for food, medicine, and dye (NPS Ethnobotany).
Today’s garden varieties range from mammoth 12-foot giants with dinner-plate-sized blooms to compact 18-inch varieties perfect for containers. Beyond the classic golden yellow, modern breeding has introduced burgundy, bronze, mahogany, bicolor, and even creamy white varieties.
Traditional single-stemmed varieties produce one magnificent bloom per plant, while branching types develop multiple smaller flowers ideal for cutting gardens.
Growing Sunflowers from Seed
Sunflowers are among the most rewarding seeds to grow, with their rapid germination and impressive growth rate:
Timing: Direct sow after all danger of frost has passed and soil temperatures reach at least 60°F. For continuous blooms, plant successive batches every 2-3 weeks.
Soil Requirements: Sunflowers adapt to most soil types but perform best in well-draining, moderately fertile soil with a pH of 6.0-7.5. They appreciate soil amended with compost.
Planting Depth and Spacing: Plant seeds 1 inch deep and 6 inches apart for most varieties. After seedlings develop their first true leaves, thin according to variety specifications—typically 12-18 inches for standard types, 18-24 inches for giant varieties.
Light and Water Needs: True to their name, sunflowers require full sun (6+ hours daily). They need regular watering until established, then can tolerate moderate drought, though flowering improves with consistent moisture.
Support: Giant varieties may require staking, especially in windy locations.
Maintenance and Care
Despite their impressive size, sunflowers require minimal care:
Watering: Keep soil moist but not soggy during the germination and establishment phase. Once plants are growing vigorously, water deeply once a week unless rainfall is adequate.
Fertilization: A balanced, slow-release fertilizer at planting time is usually sufficient. Over-fertilization can lead to weak stems and delayed flowering.
Pest Management: Protect seedlings from birds with row covers until they’ve developed several true leaves. For deer pressure, consider protective netting or companion planting with strongly scented herbs.
Harvesting Seeds: If growing for edible seeds, watch for the back of the flower head to yellow and bracts to turn brown. Cut heads with 1-2 feet of stem attached and hang upside down in a well-ventilated area until completely dry.
Sunflower Varieties for Different Purposes
The diversity of sunflower varieties allows you to select the perfect type for your specific garden needs:
Giant Types: Varieties like ‘Russian Mammoth’ or ‘Sunzilla’ (10-12 feet) create dramatic focal points.
Cutting Garden Varieties: Branching types like ‘Autumn Beauty’ or ‘Soraya’ produce multiple blooms per plant, perfect for arrangements.
Pollen-Free Types: Varieties such as ‘ProCut’ series or ‘Sunrich Gold’ don’t shed pollen, making them ideal for cut flowers that won’t stain tablecloths.
Ornamental Types: Red-toned varieties like ‘Moulin Rouge’ or ‘Autumn Beauty’ offer unusual colors for ornamental impact.
Dwarf Types: Varieties such as ‘Teddy Bear’ or ‘Sunspot’ grow just 18-30 inches tall, perfect for containers or children’s gardens.
According to the USDA’s Agricultural Marketing Service, U.S. sunflower production for both oil and non-oil uses exceeds 2 billion pounds annually, demonstrating their agricultural significance beyond ornamental value (USDA Agricultural Marketing Service).
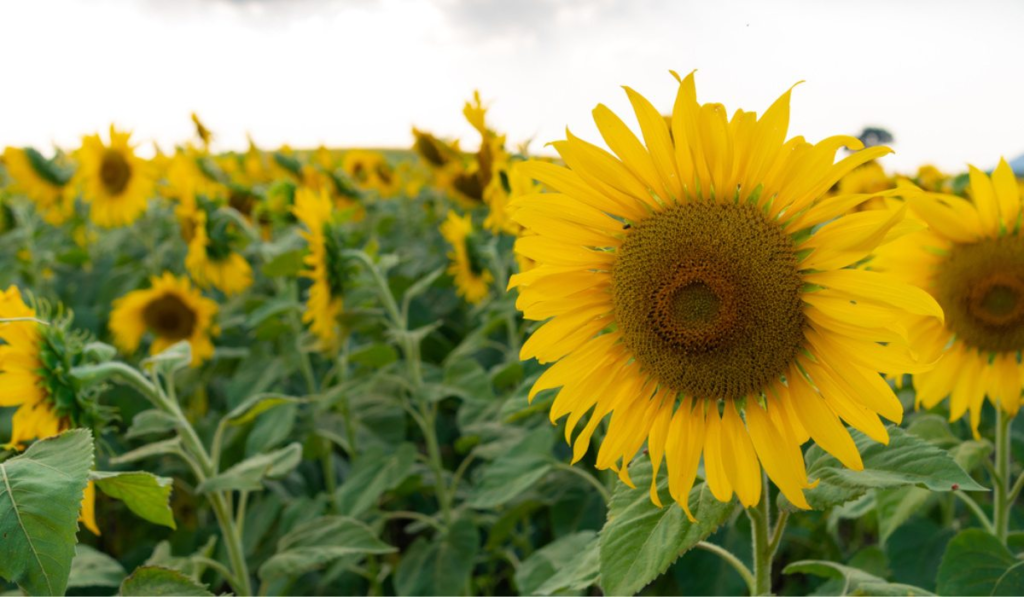
Table 5: Sunflower Varieties for Different Garden Goals
| Variety | Height | Bloom Size | Days to Maturity | Best Use | Special Feature |
|---|---|---|---|---|---|
| Mammoth Grey Stripe | 9-12 feet | 10-12 inches | 75-85 days | Bird feeding, edible seeds | Traditional giant |
| Autumn Beauty | 5-7 feet | 4-6 inches | 70-85 days | Cutting garden | Multiple branches, colors vary from yellow to burgundy |
| Teddy Bear | 2-3 feet | 4-6 inches | 75 days | Containers, children’s gardens | Fluffy double blooms |
| ProCut Bicolor | 4-5 feet | 4-6 inches | 50-60 days | Professional cutting | Pollen-free for clean arrangements |
| Valentine | 5-6 feet | 4-5 inches | 70 days | Unique color garden | Lemon-yellow with chocolate center |
Seed Starting Techniques for Success
No matter which spring flowers you choose to grow, certain techniques improve germination rates and seedling vigor across all varieties. Mastering these fundamentals will significantly enhance your success with growing flowers from seed.
Understanding Seed Dormancy
Many flower seeds have natural dormancy mechanisms that prevent germination until conditions are right. These may include:
Hard Seed Coats: Seeds like sweet peas benefit from scarification—nicking or filing the seed coat to allow water penetration.
Cold Requirements: Some perennial flowers require cold stratification (a period of cold, moist conditions) to break dormancy. This can be artificially provided in your refrigerator.
Light-Dependent Germination: Certain tiny seeds, like California poppies, need light to germinate and should be pressed onto soil surface rather than buried.
Direct Sowing vs. Indoor Starting
Your climate and the specific flower determine the best sowing method:
Direct Sowing Advantages:
- No transplant shock
- Less equipment needed
- Certain flowers (poppies, carrots, sunflowers) prefer not being transplanted
- Natural timing with seasonal cues
Indoor Starting Advantages:
- Extended growing season
- Protection from weather extremes
- Better germination rates in controlled conditions
- Earlier blooms
- Protection from outdoor pests during vulnerable seedling stage
According to the USDA’s Agricultural Research Service, temperature is the most critical factor affecting germination rates. Most spring flower seeds germinate best between 65-75°F (USDA ARS Research).
Essential Supplies for Seed Starting
Whether starting indoors or out, certain supplies improve success rates:
Indoor Starting:
- Seed-starting mix (lighter than potting soil)
- Containers with drainage
- Clear plastic covers for humidity
- Grow lights or bright window
- Heat mats for warm-season flowers
- Labels (essential for identification)
- Spray bottle for gentle watering
Direct Sowing:
- Garden fork or tiller for soil preparation
- Compost or soil amendments
- Row markers
- Seed furrow tools
- Fine-mesh sieves for covering tiny seeds
Common Seed Starting Problems and Solutions
Even experienced gardeners encounter challenges when starting flowers from seed. Here are solutions to common issues:
Damping Off: This fungal disease causes seedlings to collapse at soil level. Prevention includes using sterile seed-starting mix, providing good air circulation, and avoiding overwatering.
Leggy Seedlings: Caused by insufficient light, leading to weak, stretched stems. Provide stronger light sources and rotate trays regularly.
Poor Germination: Often related to old seeds or improper storage. Purchase fresh seeds annually for best results, or store properly in cool, dry conditions.
Inconsistent Moisture: Seeds need consistent moisture to germinate properly. Consider self-watering setups or careful monitoring for outdoor sowings.
The Extension Service of several land-grant universities, including Oregon State and Cornell, offer comprehensive online guides to seed starting that address regional climate considerations (National Institute of Food and Agriculture).
Succession Planting for Continuous Blooms
To maximize the flowering period in your garden, consider succession planting—sowing seeds at 2-3 week intervals to ensure continuous waves of blooms throughout the growing season.
Cosmos and sunflowers particularly lend themselves to succession planting. By starting your first batch indoors while soil warms, then direct sowing additional batches every few weeks, you can enjoy fresh flowers from late spring through fall.
For heat-sensitive flowers like sweet peas, focus your succession efforts during the cooler parts of the growing season, as summer heat will curtail their blooming regardless of planting date.
Harvesting and Saving Seeds
One of the greatest joys of growing flowers from seed is the ability to collect seeds from your favorite plants for next year’s garden. This practice not only saves money but allows you to select for traits that perform well in your specific growing conditions.
Tips for Successful Seed Saving:
Choose Open-Pollinated Varieties: Unlike hybrids, open-pollinated flowers produce seeds that grow true to the parent plant.
Allow Flowers to Mature Fully: Let blooms fade naturally and seed heads develop completely on the plant.
Harvest in Dry Weather: Collect seeds on a dry day after morning dew has evaporated to prevent mold issues.
Proper Storage: Store cleaned seeds in paper envelopes or glass jars in a cool, dry place. Label with variety name and collection date.
Viability Testing: Before planting saved seeds the following year, test a small sample for germination by placing them between damp paper towels in a plastic bag.
The U.S. National Center for Genetic Resources Preservation emphasizes the importance of proper seed storage conditions in maintaining seed viability (USDA ARS National Laboratory for Genetic Resources Preservation).
Creating a Cohesive Garden Design
When planning your spring flower garden, consider how these five gorgeous flowers might work together to create visual harmony while providing continuous blooms.
Designing with Height in Mind
Create depth by placing taller plants like sunflowers and cosmos toward the back of borders, medium-height sweet peas on trellises in the middle ground, and shorter California poppies and nasturtiums at the front. This classic design principle ensures all plants remain visible while creating a sense of depth.
Color Harmonies
Consider creating color themes that complement your home’s exterior or existing landscape:
Analogous Color Scheme: Plant orange California poppies, yellow sunflowers, and red nasturtiums for a warm, sunset-inspired palette.
Complementary Colors: Pair blue/purple sweet peas with yellow sunflowers for maximum visual impact.
Monochromatic Scheme: Select white varieties of cosmos, sweet peas, and sunflowers for an elegant, cohesive look.
Bloom Time Succession
Plan your garden to ensure something is always flowering:
- Early Spring: Sweet peas and California poppies
- Late Spring: Nasturtiums begin as sweet peas continue
- Early Summer: Cosmos start as California poppies finish
- Midsummer: Sunflowers join cosmos and nasturtiums
- Late Summer/Fall: Later successions of sunflowers and cosmos
Conclusion: Your Seed-to-Bloom Journey
Growing flowers from seed offers unparalleled satisfaction as you witness the entire life cycle from tiny seed to glorious bloom. The five flowers highlighted—cosmos, sweet peas, California poppies, nasturtiums, and sunflowers—provide an excellent starting point for your seed-growing adventure, offering beauty, fragrance, and garden performance with minimal investment.
As you gain confidence in your seed-starting abilities, expand your repertoire to include more varieties, creating a garden that reflects your personal style while supporting pollinators and bringing joy throughout the growing season. The U.S. Botanic Garden offers additional resources for home gardeners interested in expanding their knowledge of plant propagation and garden design (U.S. Botanic Garden).
Remember that each garden and growing season is unique—embrace the learning process, keep notes on what works in your specific conditions, and enjoy the magical transformation from seed to spectacular spring flowers. Your garden will reward your efforts with beauty, fragrance, and the special satisfaction that comes from nurturing life from its earliest beginnings.
Whether you’re growing flowers for cutting, attracting beneficial insects, creating habitat for wildlife, or simply beautifying your surroundings, these five gorgeous spring flowers from seed provide the perfect foundation for a successful and rewarding garden experience.
