Transform Your Growing Space: The Complete Guide to Straw Bale Gardening
Straw bale gardening has revolutionized how gardeners approach growing spaces, offering a solution that combines accessibility, sustainability, and impressive yields. This innovative technique transforms humble straw bales into productive growing mediums, creating elevated gardens that can thrive in virtually any location. Whether you’re dealing with poor soil, limited space, or physical gardening challenges, straw bale gardening presents an adaptable approach that both novice and experienced gardeners can master.
Why Straw Bale Gardening Is Worth Your Time
Straw bale gardening represents an innovative solution for gardeners facing challenges like poor soil quality, limited space, or physical limitations. By turning simple straw bales into productive growing mediums, this method opens up gardening possibilities for virtually everyone. Whether you’re a novice looking to start your first garden or an experienced grower seeking a more efficient approach, straw bale gardening offers numerous benefits while requiring minimal investment and setup.
The Science Behind Straw Bale Gardening
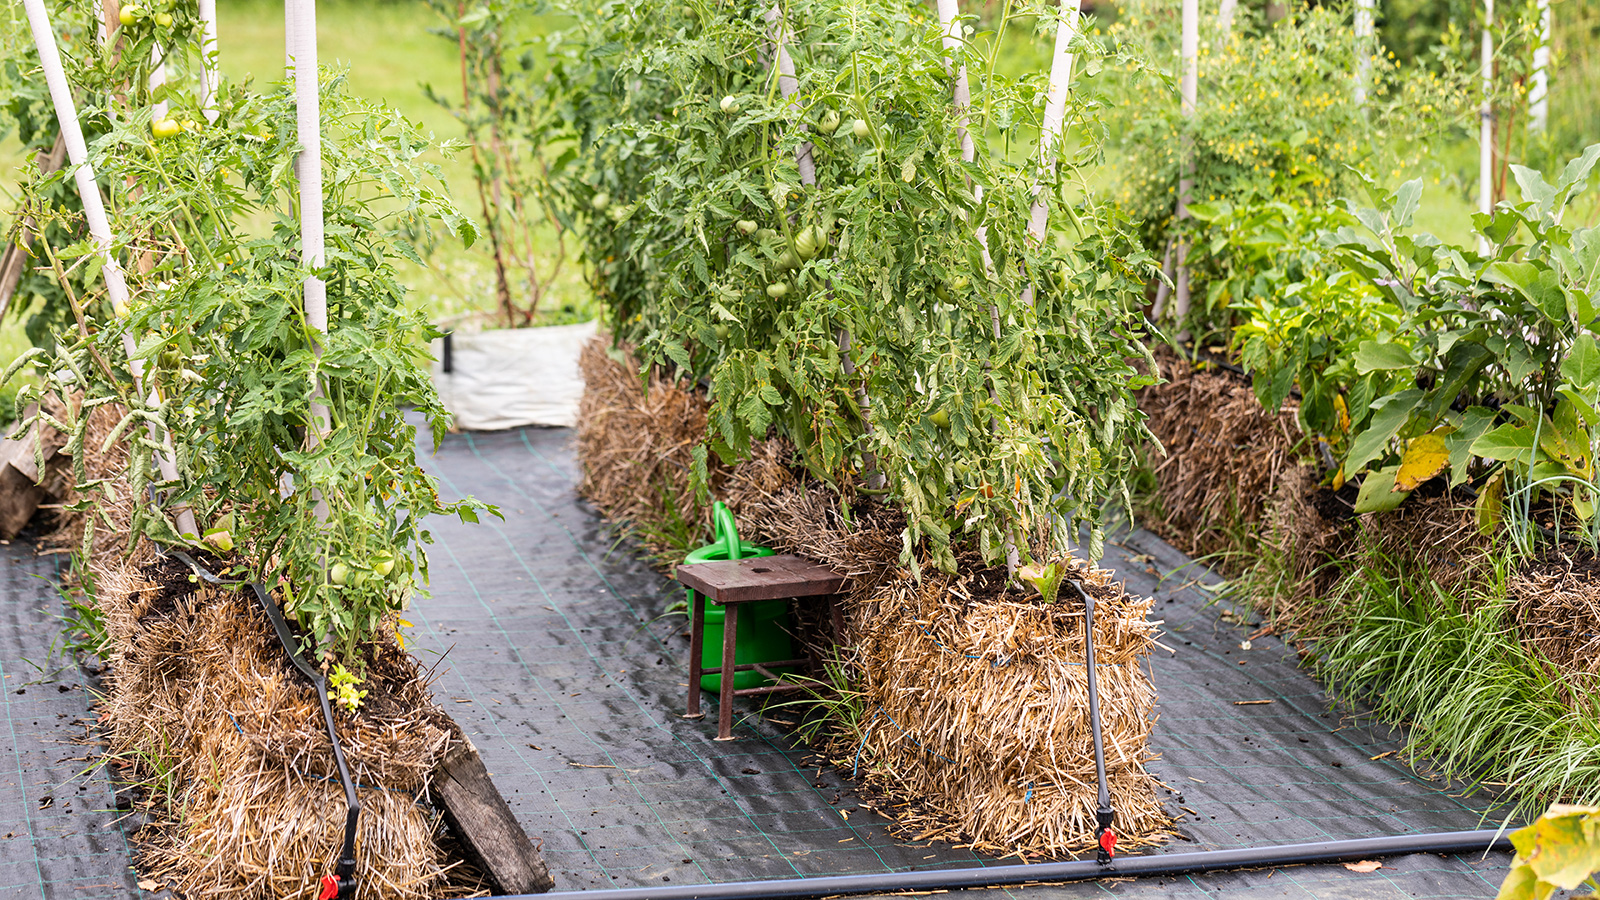
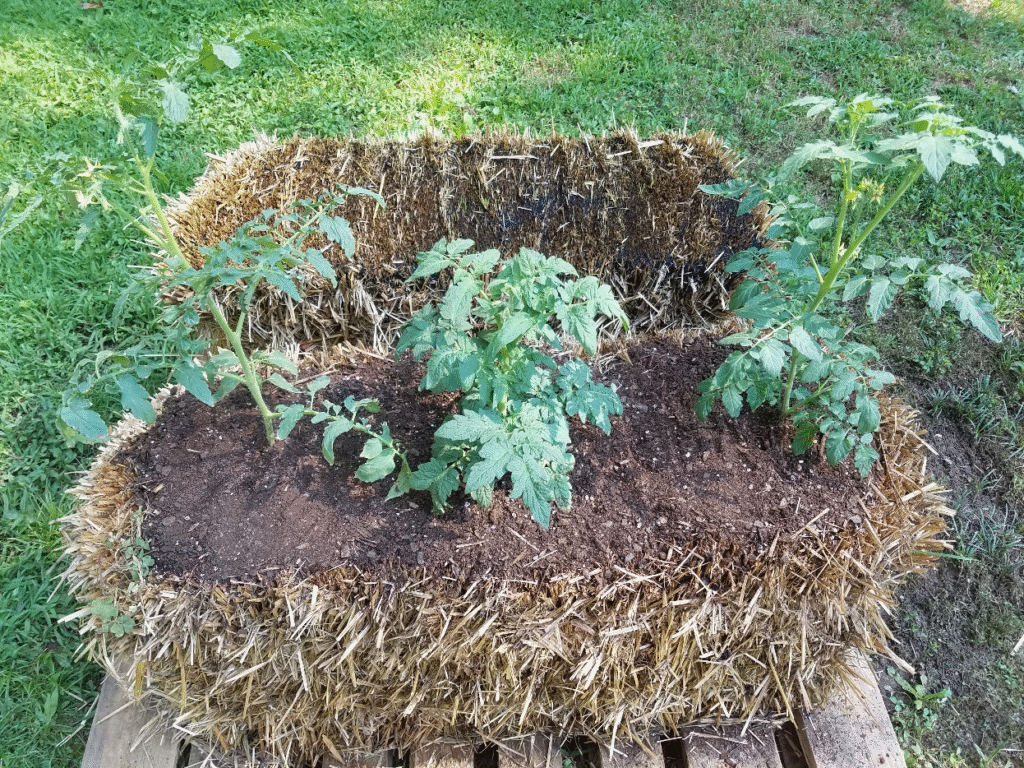
Straw bale gardening works through a controlled decomposition process. As straw begins to break down, it creates an ideal growing environment that combines the benefits of container gardening with composting. The technique uses straw bales (not hay) as raised beds where “no additional soil is needed.” The internal decomposition generates heat and nutrients, creating a rich medium that supports robust plant growth.
Think of each straw bale as “a large container with a volume of 40 gallons” that transforms “into a partially composted mass of organic matter that’s teeming with life” by the end of the growing season. This natural process creates an environment that’s warm, well-draining, and nutrient-rich—perfect conditions for growing vegetables, herbs, and flowers.
Straw vs. Hay: Understanding the Critical Difference
One of the most important distinctions to make when starting a straw bale garden is understanding the difference between straw and hay:
- Straw: Straw is “typically yellow, dry, hollow and not food for animals.” It’s the leftover stalks after grain harvesting, with seeds already removed. This makes it ideal for gardening as it contains few, if any, weed seeds.
- Hay: Hay is “made of grasses and tends to be greener and is full of seeds that will sprout and fill up your garden.” Using hay bales may result in growing more grass than vegetables.
For successful straw bale gardening, always use straw bales, preferably organic ones to avoid potential herbicide contamination.
Benefits of Straw Bale Gardening
Straw bale gardening offers numerous advantages that make it particularly appealing for many gardeners:
1. Perfect for Challenging Locations
As Oregon State University Extension notes, straw bales are beneficial when “your soil is impossibly compacted clay” and provide “an organic raised bed without the materials, labor and permanence of built ones.” They can be placed on virtually any surface, including concrete, asphalt, or poor soil.
2. Improved Accessibility
The raised height of straw bales brings gardening “up to a more manageable height for people with disabilities.” This elevation reduces bending and kneeling, making gardening more accessible for those with mobility challenges or back problems.
3. Reduced Pest and Disease Issues
With straw bale gardening, there are “no soil-borne pathogens or pests” to contend with. Starting with fresh straw means you’re working with a clean medium free from many common soil-borne diseases and pests that plague traditional gardens.
4. Minimal Weeding Required
When implemented properly, straw bale gardening has a “proven success rate” with “minimal tools needed.” The nature of conditioned straw bales means fewer weeds compete with your plants, reducing one of gardening’s most time-consuming tasks.
5. Extended Growing Season
Because decomposing straw generates heat, plants in straw bales often experience warmer root temperatures. This natural warming effect can extend your growing season by allowing earlier planting in spring and later harvests in fall in many climate zones.
6. Sustainability Built In
After the growing season, the used straw bales make “a perfect top-dressing to garden beds or a valuable addition to the compost pile.” Nothing goes to waste, as spent bales contribute rich organic matter to your compost or directly to garden beds.
Conditioning Straw Bales for Gardening
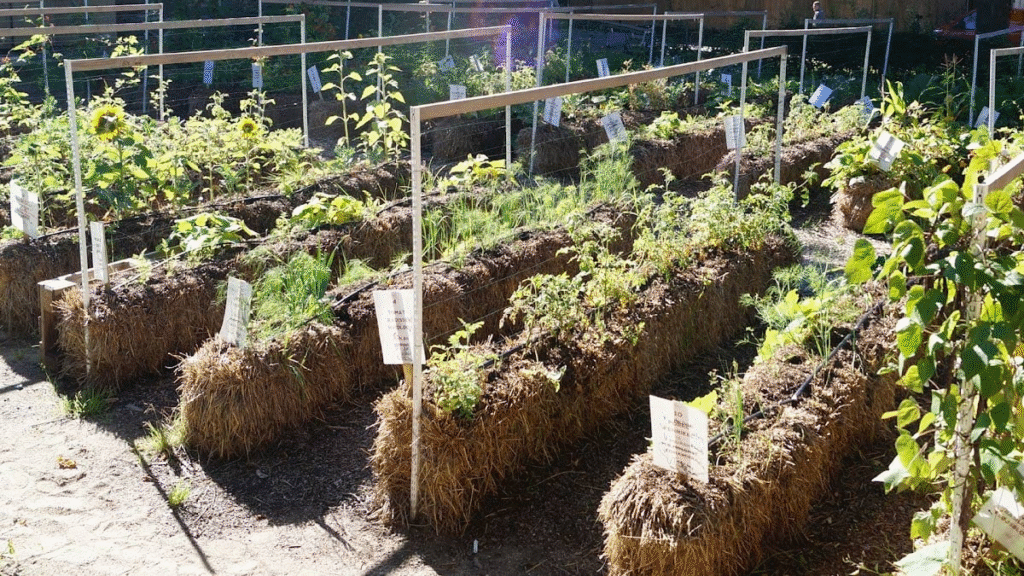
The key to successful straw bale gardening lies in properly conditioning the bales before planting. This essential process jumpstarts decomposition and creates the nutrient-rich environment your plants will need.
The Conditioning Process: A Step-by-Step Guide
Before planting, it’s recommended to “place the bale(s) at least 2 weeks prior to the optimum plant date to allow for conditioning.” This conditioning period transforms raw straw into a hospitable growing medium.
Here’s a basic conditioning timeline:
Days 1-3:
Begin by thoroughly soaking the bales with water until they are completely saturated. Water should run out the bottom of the bales, indicating complete saturation.
Days 4-6:
Apply either “½ cup of urea (46-0-0)” or organic alternatives like bone meal or fish meal to each bale, then thoroughly water it in. This nitrogen source fuels the bacterial activity that breaks down the straw.
Days 7-9:
Reduce the fertilizer to “1/4 cup per bale per day” while continuing to water thoroughly.
Day 10:
Apply a balanced fertilizer like 10-10-10, then “stop applying fertilizer but continue to keep the bale damp.”
Days 11-12:
Allow the bales to rest while maintaining moisture. By day 12, they should be ready for planting.
Testing for Planting Readiness
To determine if your bales are ready for planting, check the internal temperature. Properly conditioned bales will have cooled from their peak heat to “less than 105” degrees. You can use a compost thermometer or simply insert your hand into the bale—if it feels only slightly warm or cool to the touch, it’s ready for planting.
Organic Conditioning Options
For those preferring organic methods, blood meal or feather meal make excellent nitrogen sources for conditioning. Other organic options include fish emulsion, although it may be more expensive for conditioning multiple bales.
Keep in mind that organic conditioning processes “might take a little longer” and you should “give yourself an extra five days” compared to synthetic fertilizers.
Planting Methods for Straw Bale Gardens
Once your bales are properly conditioned, there are several methods for planting:
Method 1: Creating Planting Holes
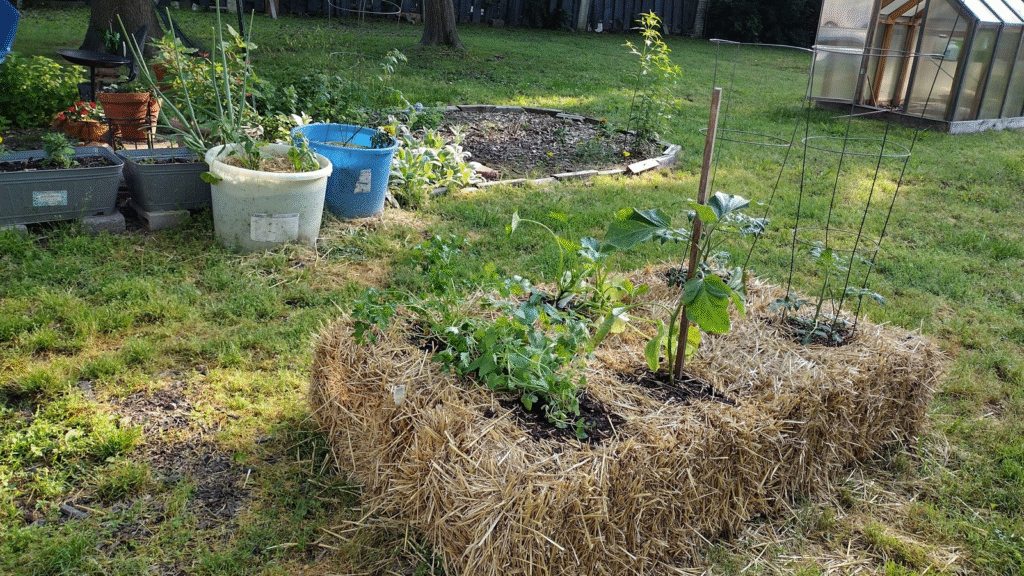
This involves making “holes (pockets or divots) within the bale” for transplanting seedlings. Using a trowel or your hands, create holes large enough to accommodate the root balls of your transplants, then add a small amount of potting soil around the roots.
Method 2: Flatbed Planting
For direct seeding, “place approximately 2 to 4 inches of growing medium across the top of the conditioned bale(s) creating a ‘flatbed’ and moisten with water.” This works particularly well for small seeds that need consistent moisture.
Method 3: Side Planting
For maximum growing space, you can also “plant in the side of your bale” by carefully pushing apart the straw to create planting pockets. This works well for strawberries and trailing plants, effectively increasing your planting area.
Growing Strawberries in Straw Bales
Strawberries are particularly well-suited to straw bale gardening, making them an excellent choice for beginners and experienced gardeners alike.
Why Strawberries Thrive in Straw Bales
While “it’s best to avoid perennials in straw bale gardening,” strawberries are an exception. Since “strawberries can take over your yard, planting them in a straw bale is an easy way to isolate them and keep them in check.”
The elevated position of strawberries in straw bales offers several benefits:
- Better drainage, which prevents root rot
- Protection from soil-borne diseases
- Reduced pest issues, especially from slugs and ground-dwelling insects
- Cleaner fruit that doesn’t come in contact with soil
- Easier harvesting with less bending
Planting Techniques for Strawberries
To plant strawberries in straw bales, first ensure the bales are thoroughly wet and have started composting. Then “dig out a rectangular area on top” about 4-5 inches deep and add “potting soil and compost along with a small amount of all-purpose fertilizer.”
Plant one strawberry plant per hole and top up with extra potting mix. Water well and continue to feed and water regularly throughout the growing season.
Best Strawberry Varieties for Straw Bales
When selecting strawberry varieties for straw bale gardening, consider these options:
- Day-neutral varieties like ‘Albion’, ‘Seascape’, and ‘Tribute’ provide extended harvests throughout the growing season.
- June-bearing varieties like ‘Earliglow’, ‘Jewel’, and ‘Allstar’ produce one large crop in early summer.
- Alpine strawberries with their smaller but intensely flavored fruits work exceptionally well in the bale edges.
Choose varieties that don’t produce excessive runners for easier management in the confined space of a straw bale.
Maintaining Your Straw Bale Garden
Proper maintenance ensures a productive straw bale garden throughout the growing season:
Watering Requirements
Straw bales “are always decomposing and creating a lot of heat,” which means “water evaporates quickly, so you’ll need to water them frequently.” Consistent moisture is crucial for plant health and continued decomposition of the bale.
Consider installing a drip irrigation system to maintain consistent moisture with minimal effort. In hot weather, straw bales may need daily watering or even twice-daily checks during extreme heat.
Fertilizing Schedule
As plants grow, they “will need additional fertilization.” Apply “a 1/2 to 1 cup of balanced fertilizer per bale each month” or use organic alternatives like “bone meal, fishmeal, blood meal, or compost.”
Liquid fertilizers like fish emulsion or compost tea work particularly well for straw bale gardens as they penetrate throughout the bale, reaching all plant roots.
Trellising and Support
Many plants grown in straw bales, especially vining varieties, benefit from sturdy support systems:
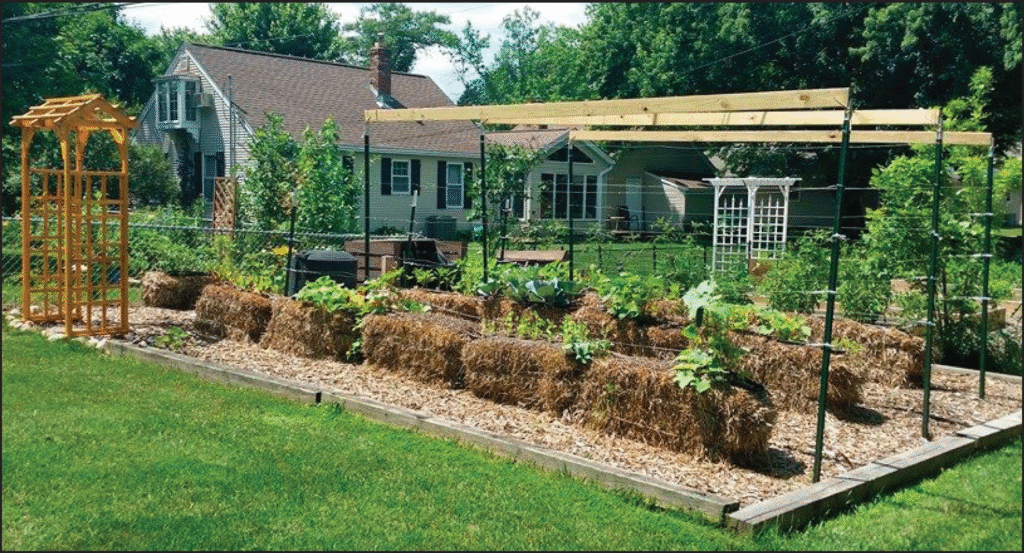
- Install stakes at the ends of bale rows and run twine or wire between them
- Place tomato cages directly into the bales for indeterminate tomatoes
- Use decorative trellises for climbing beans, cucumbers, and other vining crops
For trellis construction, “place 5 to 7 foot tall posts at the ends of one or more straw bales in a row. Run wire or string from post to post at 10 inch spacing intervals.”
Common Challenges and Solutions
While straw bale gardening offers many advantages, be prepared to address these potential challenges:
Excessive Heat During Conditioning
Problem: Sometimes bales can heat up too much during conditioning. Solution: Monitor temperatures and don’t plant until “the bale has cooled down to about the same as the ambient temperature.” Wait an extra day or two if necessary.
Herbicide Contamination
Problem: Some straw may contain residual herbicides that can harm plants. Solution: Source certified organic straw or conduct a simple bioassay test by growing some sensitive plants like peas in a sample of the straw mixed with potting soil.
Rapid Decomposition
Problem: Bales can break down faster than expected in hot, humid conditions. Solution: Reinforce bales with hardware cloth or poultry netting, and consider using sisal or jute-bound bales rather than plastic-bound ones.
Nutrient Deficiencies
Problem: Plants may show signs of nutrient deficiencies as the season progresses. Solution: Apply supplemental fertilizers like liquid bone meal diluted with water (about 2 tablespoons per gallon) to address specific deficiencies.
Best Plants for Straw Bale Gardens
While many plants thrive in straw bales, some are particularly well-suited to this growing method:

Vegetables That Excel in Straw Bales
Top performers include tomatoes, peppers, eggplants, summer squash, and lettuce. Tomatoes “love that warm, sunny weather” created in straw bales.
Other excellent choices include “tomatoes, cucumbers, peppers, squash, eggplant, lettuces, basil, and other herbs” with the exception of rosemary, which prefers drier conditions.
Plants to Avoid
Not all plants are ideal candidates for straw bale gardening:
- Corn should be avoided “as the roots take up half a bale per stalk” and doesn’t provide good yield for the space used.
- Tall plants like “corn and okra are not good candidates” as they “tend to grow tall, have a tendency to root shallower than needed, become top heavy, and may encounter pollination restrictions.”
- Long-term perennials like asparagus and rhubarb aren’t suitable as the bales will decompose before these plants reach maturity.
Videos and Resources for Straw Bale Gardeners
Visual demonstrations can be incredibly helpful for understanding the straw bale gardening process. Here are some valuable resources to explore:
- Joel Karsten, who pioneered modern straw bale gardening techniques, offers numerous resources including books, online videos, and classes on the subject.
- Many agricultural extension services provide instructional videos and fact sheets about straw bale gardening, including Washington State University Extension and University of Arkansas Extension.
- Look up “straw-bale gardening videos” online to find demonstrations of the entire process, from conditioning to planting.
These visual resources can help clarify techniques that may be difficult to visualize from written descriptions alone.
End-of-Season Considerations
As the growing season concludes, your straw bales will have significantly decomposed:
Repurposing Spent Bales
The straw bales “will last the growing season but will be useful in the fall/winter as mulch for your garden.” The partially decomposed straw makes excellent mulch for perennial beds or can be added to compost piles.
Planning for Next Season
After harvesting, the spent bales make “a perfect top-dressing to garden beds or a valuable addition to the compost pile.” Begin planning your next straw bale garden, considering crop rotation principles even though you’ll be using fresh bales.
Conclusion: Is Straw Bale Gardening Right for You?
Straw bale gardening represents an accessible, flexible, and productive approach to growing food and flowers. Its minimal setup requirements and impressive versatility make it suitable for gardeners of all experience levels and physical abilities.
Whether you’re dealing with poor soil, limited space, or simply want to try an innovative growing method, straw bale gardening offers a solution that combines the best aspects of raised bed and container gardening with built-in sustainability. As the bales decompose, they create not only a season of bountiful harvests but also valuable organic matter to enrich your garden for years to come.
By starting with proper conditioning, selecting appropriate plants, and maintaining consistent care, your straw bale garden can transform a few simple bales of straw into a productive, beautiful growing space that defies limitations and expands possibilities.
