Transform Your Space with Hay Bale Gardening: A Complete Guide to Growing Above Ground
For gardeners with challenging soil conditions, limited space, or physical limitations that make traditional gardening difficult, hay bale gardening offers an innovative and accessible solution. This above-ground gardening method can transform virtually any outdoor space into a productive growing area—no digging required. In this comprehensive guide, we’ll explore how to create, condition, and maintain a thriving hay bale garden, with special attention to growing strawberries and other versatile crops in this unique medium.
What Is Hay Bale Gardening?
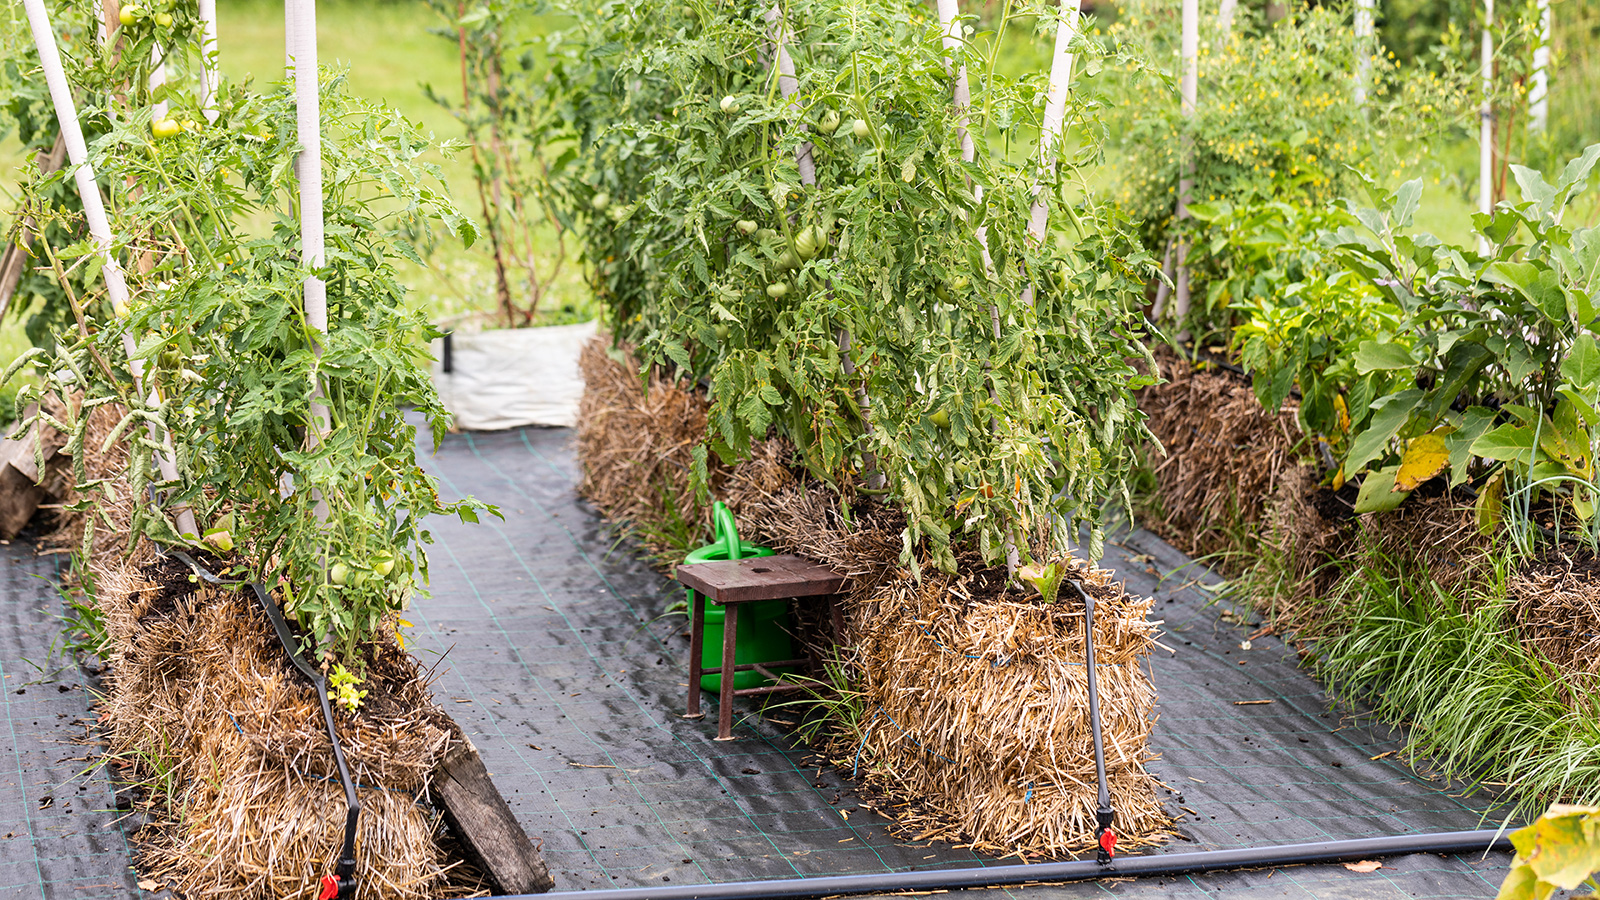
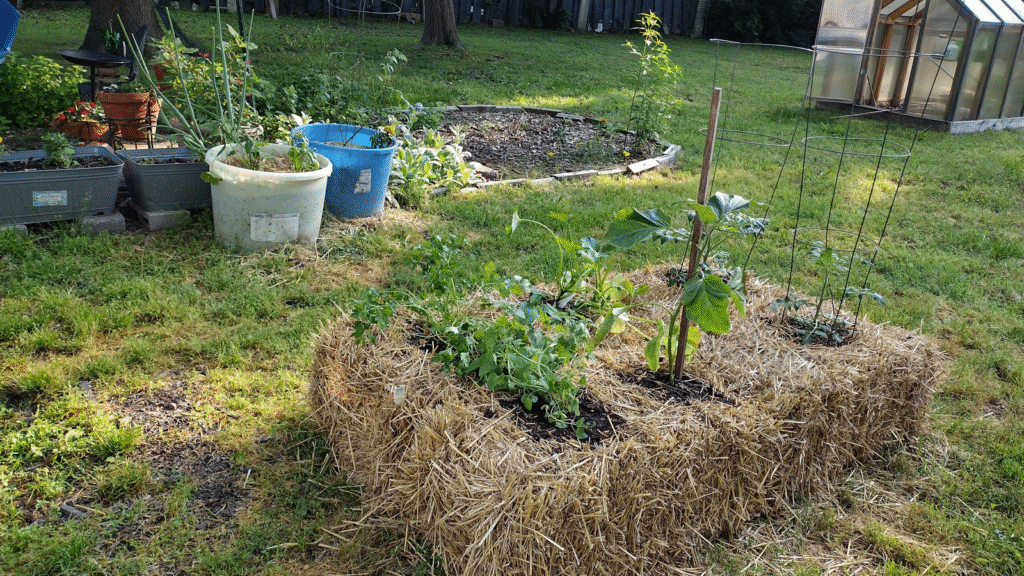
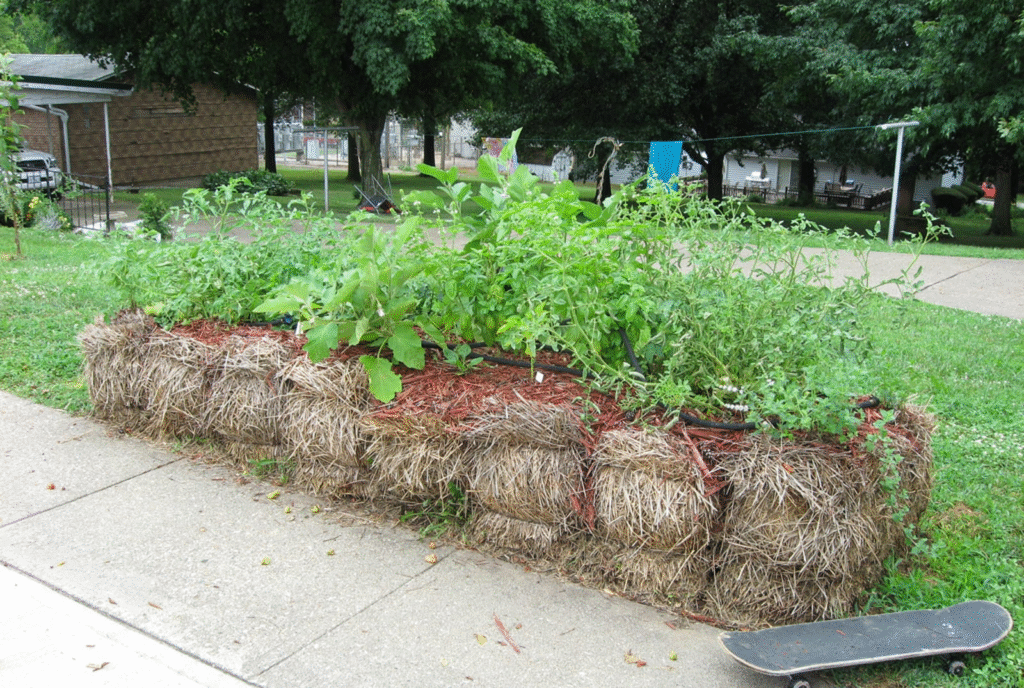
Hay bale gardening (sometimes called straw bale gardening) is a form of container gardening where conditioned hay or straw bales serve as both the growing container and the medium. As the bales decompose throughout the growing season, they create a nutrient-rich environment perfect for plant roots while elevating the growing surface to a more accessible height.
“Hay bale gardening combines the benefits of raised bed gardening with container growing, but with significantly less construction and cost,” explains Master Gardener Janice Reynolds, who has been teaching this technique for over a decade. “It’s particularly valuable for areas with poor soil or contaminated ground.”
Hay vs. Straw: Understanding the Difference
Before we dive into the conditioning process, it’s important to distinguish between hay and straw bales:
Hay is made from dried grasses and often contains seeds. It’s typically more nutrient-rich than straw but may introduce grass and weed seeds into your garden.
Straw is the dried stalks remaining after grain harvest (wheat, oat, barley). It contains fewer seeds and breaks down more slowly than hay.
While both materials work, many experienced gardeners prefer straw bales for their reduced weed potential. However, true hay bales can be more readily available and less expensive in many regions. For this guide, we’ll use “hay bale” as the general term, but the techniques apply to both materials.
Materials and Planning Your Hay Bale Garden
What You’ll Need:
- Hay or straw bales (one bale for every 2-3 plants, depending on variety)
- High-nitrogen fertilizer (organic options include blood meal or feather meal)
- Complete organic fertilizer with micronutrients
- Garden hose with spray nozzle
- Compost or potting soil (for planting)
- Plants or seeds appropriate for bale gardening
- Soaker hose or drip irrigation system (optional but recommended)
- Liquid fish emulsion or seaweed fertilizer
- Garden stakes (for taller plants)
- Landscape fabric (if placing on lawn)
Site Selection
Your hay bale garden location should receive at least 6-8 hours of direct sunlight daily for most vegetables and fruits. Consider these factors:
- Accessibility: Place bales where you can easily reach all sides for maintenance
- Water access: Position near a water source, as bales require frequent watering
- Orientation: Align bales with the cut side up (strings around the sides)
- Protection: For strawberries especially, consider placing bales where they’ll have some protection from extreme afternoon heat
Expert Tip: If placing bales on grass or soil, lay landscape fabric underneath to prevent weeds from growing up through the bales. On hard surfaces like patios, this step isn’t necessary.
Conditioning Hay Bales for Gardening: The Essential Process
The conditioning process is crucial for successful hay bale gardening. This 10-14 day procedure kickstarts decomposition within the bale, creating a hospitable environment for plant roots. Follow this conditioning chart for optimal results:
Complete Hay Bale Conditioning Chart (10-14 Days)
Days 1-3: Initial Soaking and Fertilizing
- Water each bale thoroughly until completely saturated (approximately 1-2 gallons per bale)
- Apply ½ cup high-nitrogen fertilizer (approximately 30-0-0) evenly across the top surface
- Water again to wash fertilizer into the bale
- Keep bales consistently moist throughout the conditioning process
Days 4-6: Continue Nitrogen Application
- Apply ¼ cup high-nitrogen fertilizer to each bale
- Water thoroughly to wash fertilizer into the bale
- Monitor internal temperature (bales will begin heating up as decomposition starts)
Days 7-9: Reduce Nitrogen Application
- Apply ¼ cup high-nitrogen fertilizer to each bale
- Water thoroughly
- Test internal temperature by inserting your hand into the bale—it should feel warm as beneficial microbes multiply
Day 10: Final Fertilization
- Apply 1 cup of complete balanced organic fertilizer (like 5-5-5)
- Water thoroughly to distribute nutrients
Days 11-14: Cooling and Preparation
- Continue watering daily but apply no additional fertilizer
- Check internal temperature—bales should start cooling down
- When internal temperature drops below 100°F (feels slightly warm to the touch), the bales are ready for planting
“The conditioning process is non-negotiable,” warns urban gardening expert Michael Tortorello. “Skipping or rushing these steps will result in nitrogen deficiency, poor plant growth, and potentially burning young plant roots in too-hot bales.”
During conditioning, the core temperature of hay bales can reach up to 140°F (60°C) as microorganisms break down the internal structure. This heat kills most weed seeds present in the hay while creating the perfect environment for beneficial decomposer organisms.
Troubleshooting the Conditioning Process
If bales aren’t heating up:
- Ensure adequate nitrogen application
- Check that bales remain consistently moist
- Add a shovelful of garden soil to introduce more microorganisms
If bales remain too hot after day 14:
- Continue daily watering without additional fertilizer
- Wait until internal temperature moderates before planting
- Consider using a compost thermometer for precise monitoring
Planting Your Hay Bale Garden
Once your bales are properly conditioned, they’re ready for planting. The approach differs slightly depending on whether you’re planting seeds or transplants.
For Transplants (Including Strawberry Plants):
- Create planting pockets by gently pulling apart the top of the bale to form 3-4 inch deep depressions
- Fill each planting pocket with a few inches of compost or potting soil
- Gently place your transplant into the soil, ensuring good root contact
- Water thoroughly but gently around each plant
For Direct Seeding:
- Spread a 1-2 inch layer of compost or potting mix across the entire top surface of the bale
- Sow seeds according to packet directions for spacing and depth
- Keep the surface consistently moist until germination
- Thin seedlings as necessary once they develop true leaves
Plant Spacing Guidelines
Per standard hay bale (approximately 3’×1.5′):
- 2-3 tomato or zucchini plants
- 3-4 pepper or eggplant
- 4-5 cabbage or broccoli
- 8-10 strawberry plants
- 2-3 rows of beans or peas (with trellising)
- 2-3 rows of leaf lettuce or spinach
Growing Strawberries in Hay Bales: A Perfect Pairing
Strawberries thrive in hay bale gardens, making this combination particularly worthwhile for home gardeners. The elevated growing position keeps berries clean and reduces pest issues while providing excellent drainage—a key requirement for strawberry success.
Strawberry Planting Strategy
For the most productive strawberry hay bale garden:
- Choose the right variety for your climate and goals:
- June-bearing varieties for a single, large harvest
- Everbearing or day-neutral varieties for extended production
- Alpine strawberries for continuous small harvests of intensely flavored berries
- Plant strawberries in a staggered pattern across the bale, approximately 8-10 plants per standard bale
- Position plants so crowns are level with the growing medium (not buried too deep)
- Trim runners during the first growing season to encourage crown development and stronger plants
- Apply balanced organic fertilizer monthly during the growing season
- Mulch with pine straw or clean hay around plants to keep developing berries clean
Strawberries grown in hay bales often produce earlier harvests than those grown in traditional gardens. The decomposing hay naturally generates heat, essentially creating a slightly warmed growing environment that can extend your growing season by 2-3 weeks.
“Strawberries and hay bale gardening are a natural match,” explains berry specialist Dr. Marvin Pritts. “The excellent drainage prevents the root rot issues that often plague strawberry plants, while the elevated position makes harvesting considerably easier on the gardener’s back.”
Irrigation Considerations for Strawberries in Hay Bales
Proper watering is crucial for strawberry success in hay bale gardens:
- Install soaker hoses or drip irrigation across the tops of bales for consistent moisture
- Avoid overhead watering, which can promote fungal diseases on berries and foliage
- Water more frequently than conventional gardens—hay bales dry out faster, especially in hot weather
- Check moisture levels daily during peak growing season
- Apply water until it runs from the bottom of the bale, then wait until the top inch feels dry before watering again
Maintaining Your Hay Bale Garden Throughout the Season
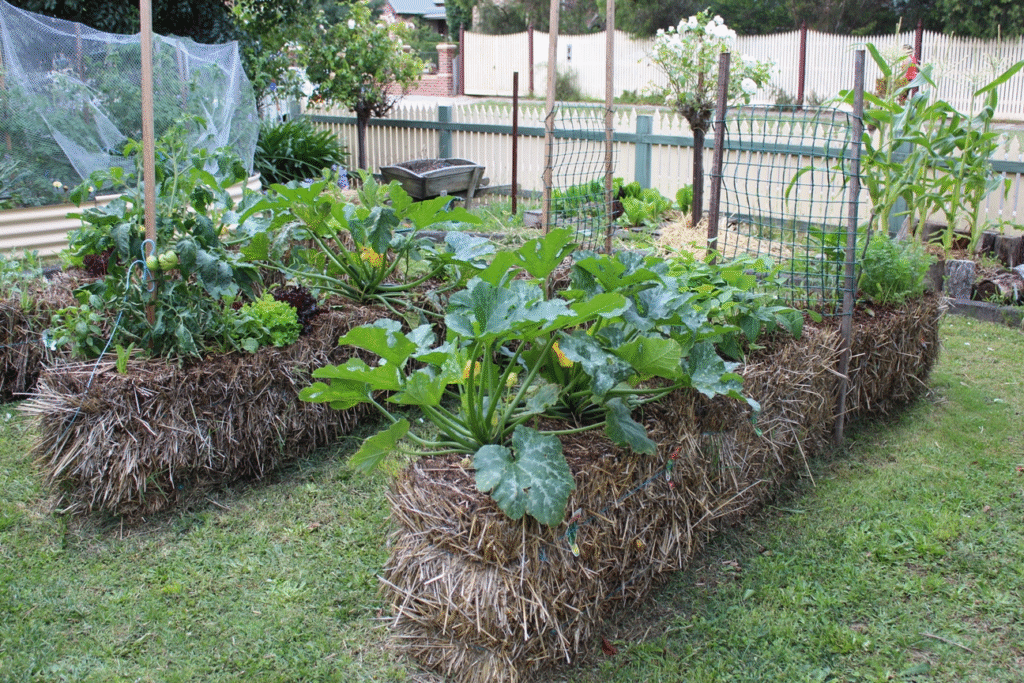
Water Management
Hay bale gardens require more frequent watering than traditional gardens:
- In moderate weather: water thoroughly every 2-3 days
- During hot weather: daily watering is often necessary
- Check moisture levels by inserting your finger into the bale—if it feels dry 1-2 inches down, it’s time to water
- Consider automatic irrigation systems for consistent moisture
Fertilizing Schedule
Hay bales continue decomposing throughout the growing season, releasing nutrients as they break down. However, supplemental feeding is necessary for heavy feeders:
- Weekly application of diluted liquid fish emulsion or seaweed fertilizer
- Monthly light application of balanced organic fertilizer
- For strawberries specifically, reduce nitrogen after flowering begins to improve fruit quality
Pest and Disease Management
The elevated nature of hay bale gardens naturally reduces many common soil-borne diseases and ground-dwelling pests. However, monitor for:
- Slugs (particularly problematic in very wet conditions)
- Aphids on tender new growth
- Spider mites during hot, dry periods
- Fungal issues during extended rainy periods
Integrated pest management practices work exceptionally well with hay bale gardens. The isolated growing environment makes it easier to spot problems early and address them before they spread.
Using Hay Bales for Gardening: Beyond the Basics
Once you’ve mastered the fundamentals of hay bale gardening, consider these advanced techniques to maximize your success:
Creative Configurations
- Hay Bale Walls: Place bales in a U-shape to create a wind-protected microclimate
- Stepped Gardens: Arrange bales in tiers on slopes for better access and visual interest
- Keyhole Design: Arrange bales in a circle with an access path for efficient space utilization
Season Extension
The decomposing hay naturally generates heat that can extend your growing season:
- Place plastic tunnels or cold frames over bales for earlier spring planting
- Position bales against a south-facing wall to capture reflected heat
- Use row covers for frost protection, creating a double warming effect
Year Two Options
While hay bales typically last only one growing season before decomposing too much for structural integrity, the resulting material becomes valuable:
- Use partially decomposed hay bales as excellent compost additions
- Create new garden beds directly atop the decomposed materials
- Use the rich, broken-down material as mulch around perennial plants
Common Challenges and Solutions in Hay Bale Gardening
Challenge: Excessive Heat During Conditioning
Solution: Monitor internal temperatures daily during conditioning. If temperatures exceed 145°F, water more heavily to moderate the decomposition process. Never plant into a hot bale—patient gardeners are rewarded with better results.
Challenge: Bales Drying Out Too Quickly
Solution: Apply a mulch layer of compost or straw on top of the bales after planting to help retain moisture. Consider installing drip irrigation with an automatic timer for consistent watering.
Challenge: Nitrogen Deficiency (Yellowing Plants)
Solution: Decomposing hay consumes nitrogen. If plants show yellowing leaves, supplement with additional liquid fish emulsion or an organic nitrogen fertilizer every 7-10 days until symptoms improve.
Challenge: Bale Shrinkage
Solution: Expect bales to shrink by 25-50% throughout the growing season as decomposition progresses. Plan support structures accordingly, especially for taller plants like tomatoes or trellised crops.
Seasonal Wrap-Up and Planning Ahead
As your growing season concludes, your hay bales will have significantly decomposed. Here’s how to properly close the season and prepare for next year:
- Harvest remaining crops before heavy frost
- Remove any non-decomposed twine or bindings
- Break apart remaining bale material for composting
- Select new location for next year’s hay bale garden (rotation helps prevent disease buildup)
- Begin sourcing fresh bales for the coming season
- Consider soil testing the decomposed material before incorporating into garden beds
Conclusion: The Sustainable Appeal of Hay Bale Gardening
Hay bale gardening represents a perfect blend of accessibility, sustainability, and productivity. By transforming an agricultural byproduct into a growing medium, gardeners can create productive spaces even in challenging locations while minimizing waste and environmental impact.
Whether you’re specifically interested in growing strawberries in hay bales or exploring this method for a wider variety of crops, the fundamental techniques remain the same: proper conditioning, consistent moisture management, and attentive plant care. The result is a gardening system that can produce abundant harvests with less bending, minimal weeding, and virtually no digging.
For both beginning gardeners intimidated by traditional garden preparation and experienced growers looking to expand their growing space, hay bale gardening offers an accessible entry point with impressive results. As the growing interest in local food production and sustainable gardening practices continues to expand, this once-unusual technique has earned its place as a mainstream method worthy of consideration in any gardener’s repertoire.
